Berikut ini akan saya tampilkan sedikit bacaan mengenai delphi yang saya kutip dari situs delphi basic, ya pake bahasa inggris sih.....perhatikan:
Writing your first Delphi program
| Different types of application | |||||
| Delphi allows you to create GUI (Graphical User Interface) or Console (text-only) applications (programs) along with many other types. We will concern ourselves here with the common, modern, GUI application. | |||||
| Delphi does a lot of work for us - the programmer simply uses the mouse to click, drag, size and position graphical parts to build each screen of the application. | |||||
| Each part (or element) can be passive (displaying text or graphics), or active (responding to a user mouse or keyboard action). | |||||
| This is best illustrated with a very simple program. | |||||
Creating a simple 'Hello World' program | |||||
| When you first run Delphi, it will prepare on screen a new graphical application. This comprises a number of windows, including the menu bar, a code editor, and the first screen (form) of our program. Do not worry about the editor window at the moment. | |||||
| The form should look something like this : | |||||
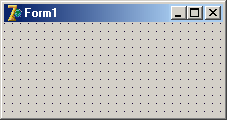 | |||||
| We have shown the form reduced in size for convenience here, but you will find it larger on your computer. It is a blank form, onto which we can add various controls and information. The menu window has a row of graphical items that you can add to the form. They are in tabbed groups : Standard, Additional, Win32 and so on. | |||||
| We will select the simplest from the StandardAA will then show as selected: collection. Click on the image to select a Label. This | |||||
 | |||||
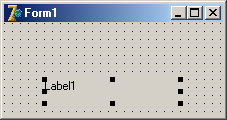
| Having selected a graphical element, we then mark out on the form where we want to place the element. This is done by clicking and dragging. This gives us our first form element: | |||||
 | |||||
Changing graphical element properties | |||||
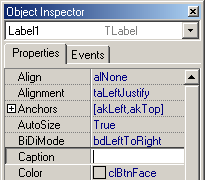
| Notice that the graphical element contains the text Label1 as well as resize corners. The text is called the Caption, and will appear when we run the application. This CaptionProperty of the label. The label has many other properties such as height and width, but for now, we are only concerned with the caption. is called a | |||||
| Let us blank out the caption. We do this in the window called the Object Inspector (available under the View menu item if not already present): | |||||
 | |||||
Adding an active screen element | |||||
| If we now return to the Standard graphical element collection, and select a button, shown as a very small button with OK on it, we can add this to the form as well: | |||||
 | |||||
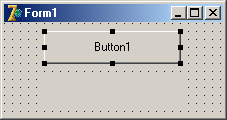 | |||||
| We now have a label and a button on the form. But the button will do nothing when pressed until we tell Delphi what we want it to do. | |||||
| So we must set an action, called an Event, for the button. The main event for a button is a Click. This can be activated simply by double clicking the button on the form. | |||||
| This will automatically add an event called OnClick for the button, and add a related event handler in the program code: | |||||
 | |||||
| This 'skeleton' code will not do anything as it stands. We must add some code. Code that we add will run when the button is clicked. So let us change the label caption when the button is pressed. | |||||
| As we type, Delphi helps us with a list of possible options for the item we are working on. In our instance, we are setting a Label caption: | |||||
 | |||||
Here you see that Delphi has listed all appropriate actions that start with ca. If we press Enter, Delphi will complete the currently selected item in the list. We assign a text value 'Hello World' to the caption property. Note that we terminate this line of code with a ; - all Delphi code statements end with this indicator. It allows us to write a command spread across multiple lines - telling Delphi when we have finished the command. | |||||
 | |||||
And we have now finished our very simple action - we will set the label to 'Hello World' when the button is pressed. | |||||
Running our first program | |||||
To run the program, we can click on the Green triangle (like a Video play button), or press F9. When the program runs it looks like this: | |||||
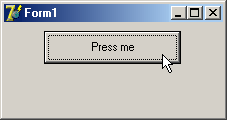 | |||||
| When we click on the button, we get: | |||||
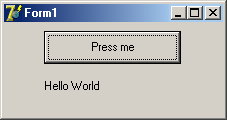 | |||||
| and our program has set the Label text as we requested. | |||||
Note that the program is still running. We can click as many times as we like with the same outcome. Only when we close the program by clicking on the top right X will it terminate. | |||||
Looking at the code that Delphi generated | |||||
Whilst we have only typed one line of code, Delphi has typed many for us. Let us first look at the main program code. Notice that we have added comments (in green, starting with the // comment identifier). These are ignored by the Delphi compiler, but help the coder understand the code. You can click on any word marked in blue to see reference information for that word: | |||||
| |||||
| This code is called a UnitUnit1.pas - a Pascal file. and is a Delphi module - one chunk of code. If you save this code, it will save in a file called | |||||
The unit comprises two main parts - the interfaceimplementation section that holds the code that implements the interface. Click on the unit keyword in the code to learn more. section, which tells what the unit does. And an | |||||
| Untuk lebih jelasnya silahkan kunjungi situs aslinya di http://delphibasics.co.uk/Article.asp?Name=FirstPgm | |||||

Tidak ada komentar:
Posting Komentar